![[Home]](../ipstats.gif) Plotting DS18S20 Temperature Readings Using SVG
Plotting DS18S20 Temperature Readings Using SVG
In 2008 I tried som PIC16F assembler to read the DS18S20 temperature chip. http://www.dougrice.plus.com/dev/sl004ds1820.asm
I had brought one of these kits. https://quasarelectronics.co.uk/Item/3145-ds18s20-computer-serial-temperature-data-logger
It needs a computer with a serial port logging the output. I turn off my laptops and desktops.
Now the Raspberry Pi can be left powered up, and now I know how to use "crontab -e", or /etc/rc.local to start my logging script on reboot.
The Raspberry Pi One Wire interface simplifies reading a collections of DS18S20 or DS18B20.
http://www.dougrice.plus.com/dev/logger88/DS18S20.pdf - datasheet for Dallas DS18S20
This page records some work on using DS18S20 with Raspberry Pi and plotting using AWK, SVG and JavaScript.
Using the kernal extensions ( see links ) the Raspberry Pi can use the "one wire" interface to read the Dallas 18S20 temperature chips.
I use a shell script to poll the chips and append the readings to a file of JavaScript function calls and other text files.
An awk script is used to extract the text and populate the gbF() function calls. If written to a file, the file can be included into an SVG file.
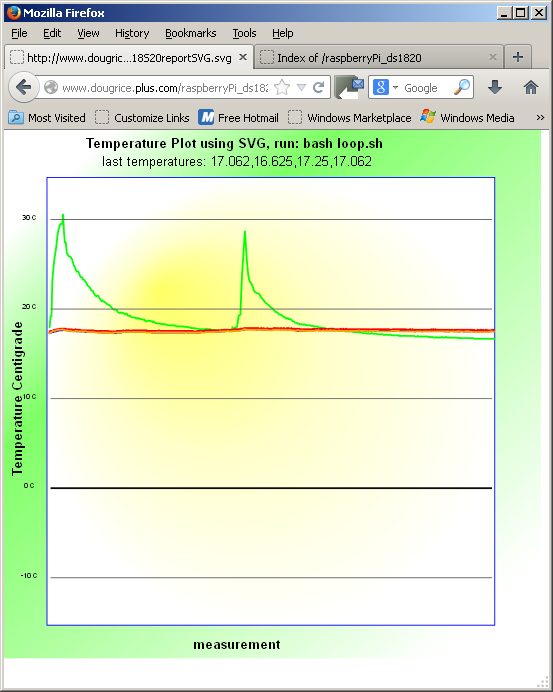
Using JavaScript in an SVG file, I plot the data as a simple graph. The SVG file does a location.reload() to update.
This is run in the Midori 0.4.3 web browser that renders the SVG file.
example: http://www.dougrice.plus.com/raspberryPi_ds1820/loopDS18S20reportSVG.svg
files: http://www.dougrice.plus.com/raspberryPi_ds1820/
enable One wire using /bin/raspi-config
To run every 15 minutes add this to a cron job
crontab -e
 #Add this
 #
 # m h  dom mon dow   command
 # poll DS18S20.sh using one wire
 0,15,30,45 * * * *  /usr/bin/bash /home/pi/log18S20.sh
Edit log18S20.sh bash script that is run every 15 minutes.
 cd ~
 nano log18S20.sh
 #! /bin/bash
 # log18S20.sh
 #
 echo "==="                       >> /home/pi/log18S20.txt
 date  -u +'%Y-%m-%d %H:%M'       >> /home/pi/log18S20.txt
 # only log the temperature t=
 cat /sys/bus/w1/devices/10-*/w1* | awk '/t=/ { print $10 }' >> /home/pi/log18S20.txt
Login and cat /home/pi/log18S20_rpiw.txt
I set the hostname of the Raspberry Pi Zero W to rpiw
Use SCP to fetch the file of temperatures
scp pi@rpiw://home/pi/log18S20.txt log18S20_rpiw.txt
E.G log18S20_rpiw.txt contains:-
 ===
 2025-03-14 21:45
 ===
 2025-03-14 22:00
 t=20187
 ===
 2025-03-14 22:15
 t=20125
 ===
 2025-03-14 22:30
 t=20062
An example using a Raspberry Pi Zero and DS18S20 in one room and another Raspberry Pi and another DS18S20 in another room.
These Raspberry Pi are on my local lan and only accessable from a computer on the same lan.
Every 15 minutes each Pi take a measurement and append to a file which can be included in a web page.
 gbFa( "2025-03-19 07:00 t=12375" )
 gbFa( "2025-03-19 07:15 t=12500" )
 gbFa( "2025-03-19 07:30 t=12625" )
This web page includes the data files from each pi and plots the data:-
src="http://rpiw/gb/gbFa.js" , copy in gbFar.js
src="http://patrickpi:8086/gb/gbFa.js" , copy in gbFap.js
http://www.dougrice.plus.com/dev/graphs/graphPi.htm - This Webpage includes the data and uses JavaScript to plot on the <CANVAS> on the web page.
This depends on the Raspberry Pi time and date being the same.
do_dates.bat can be used to check the clocks of the web servers I am interested in. Win 11 seems to have curl
 rem
 rem
 rem
 echo "do.bat " >temp.txt
 type do_dates.bat
 date /T >> temp.txt
 time /T >> temp.txt
 curl -s --head http://patrickpi 	 >> temp.txt
 curl -s --head http://rpiw	         >> temp.txt
 curl -s --head http://192.168.1.254	 >> temp.txt
 curl -s --head http://dougrice.co.uk    >> temp.txt
 curl -s --head http://www.bbc.co.uk	 >> temp.txt
 curl -s --head http://ccgi.dougrice.plus.com >> temp.txt
 curl -s --head http://www.dougrice.plus.com  >> temp.txt
curl -s --head http://192.168.1.63 >> temp.txt
 type temp.txt | find "Date"
 dir temp.txt
 time /T
One wire - DS18S20 reader
Used GPIO4 pin 7 - middle pin. 3v3 to power gnd to gnd
		/ 3v3
DS18S20	- top (|- buss --GPIO4--[4k7]--/
	  	\ gnd
Web pages to help:-
http://learn.adafruit.com/adafruits-raspberry-pi-lesson-11-ds18b20-temperature-sensing/hardware
http://learn.adafruit.com/adafruits-raspberry-pi-lesson-11-ds18b20-temperature-sensing/ds18b20
The script below starts the kernel module for "OneWire" and loops polling all the devices onthe Bus.
I have 4 DS18S20, which I read and set userfield1,userfield2,userfield3,userfield4 parameters in gbF() guestbook Function. This is appended to gbookFtemp.js on the desk top. The date is set to when I read the devices.
#! /bin/bash
#
#  Shell Script to poll temperature chips
#  usage:	 bash loop.sh
#
# http://learn.adafruit.com/adafruits-raspberry-pi-lesson-11-ds18b20-temperature-sensing/hardware
#
echo "---------------------"
ls /sys/bus
echo "---------------------"
sudo modprobe w1-gpio
sudo modprobe w1-therm

echo "---------------------"
ls /sys/bus
echo "---------------------"

while [[ 1 ]]
do
  echo "========" 		    > ~/Desktop/tmp.txt
  date 				   >> ~/Desktop/tmp.txt
  cat /sys/bus/w1/devices/10-*/name >> ~/Desktop/tmp.txt
  cat /sys/bus/w1/devices/10-*/w1* >> ~/Desktop/tmp.txt
  echo " "			   >> ~/Desktop/tmp.txt
  #
  # use AWK to extract the temperatures. appends gbF() to gbookFtemp.js
  #
  cat ~/Desktop/tmp.txt
  awk -f loop.awk ~/Desktop/tmp.txt

  cat ~/Desktop/tmp.txt >> ~/Desktop/loop_log.txt
  sleep 3

done
This awk script extracts the temperature and puts the results into the javascript include file.
#
#
# loop.awk
#
# usage: 	awk -f loop.awk loop_log.txt
#
#
# pull out the temperature from loop_log.txt written by loop.sh
# Appends to "gbookFtemp.js"
#
#
#//gbF( name,email,postedOn,IPaddress,userfield1,userfield2,userfield3,userfield4,comments){


BEGIN {
  FS="="

  # zero the temperatures
  ln[1]=0
  ln[2]=0
  ln[3]=0
  ln[4]=0
  # print "" > "gbookFtemp.js"
  notFirst = 0
}

/====/{
  print $0
  getline
  print $0

  lnp=1
  cnt +=1
  if ( notFirst ){
    print "gbF( 'awk','t@pi','" lastDate " ','127.0.0.1'," ln[1] "," ln[2] "," ln[3] "," ln[4] ",'comments');" >> "gbookFtemp.js"
  }
  # prepare for next readings
  notFirst = 1
  ln[1]=0
  ln[2]=0
  ln[3]=0
  ln[4]=0
  lastDate = $0
}

/t=/{
  # found a line with a temperature
  ln[lnp] = ($NF/1000)
  lnp ++
}

END {
  cnt +=1
  print "gbF( 'awk','t@pi','" lastDate " ','127.0.0.1'," ln[1] "," ln[2] "," ln[3] "," ln[4] ",'comments');" >> "gbookFtemp.js"
}
gbF( 'awk','t@pi','Sun Feb  9 10:30:47 UTC 2014 ','127.0.0.1',17.375,18,17.5,17.312,'comments');
gbF( 'awk','t@pi','Sun Feb  9 10:30:53 UTC 2014 ','127.0.0.1',17.312,18,17.5,17.312,'comments');
gbF( 'awk','t@pi','Sun Feb  9 10:31:00 UTC 2014 ','127.0.0.1',17.375,19.187,17.562,17.375,'comments');
gbF( 'awk','t@pi','Sun Feb  9 10:31:06 UTC 2014 ','127.0.0.1',17.375,19.187,17.562,17.437,'comments');
gbF( 'awk','t@pi','Sun Feb  9 10:31:13 UTC 2014 ','127.0.0.1',17.437,23.25,17.562,17.5,'comments');
gbF( 'awk','t@pi','Sun Feb  9 10:31:20 UTC 2014 ','127.0.0.1',17.437,24.375,17.625,17.562,'comments');
gbF( 'awk','t@pi','Sun Feb  9 10:31:27 UTC 2014 ','127.0.0.1',17.5,25.375,17.687,17.562,'comments');
gbF( 'awk','t@pi','Sun Feb  9 10:31:33 UTC 2014 ','127.0.0.1',17.5,26.062,17.687,17.562,'comments');
gbF( 'awk','t@pi','Sun Feb  9 10:31:40 UTC 2014 ','127.0.0.1',17.5,26.687,17.687,17.625,'comments');
gbF( 'awk','t@pi','Sun Feb  9 10:31:46 UTC 2014 ','127.0.0.1',17.562,27.562,17.75,17.625,'comments');
gbF( 'awk','t@pi','Sun Feb  9 10:31:53 UTC 2014 ','127.0.0.1',17.562,28.437,17.75,17.687,'comments');
gbF( 'awk','t@pi','Sun Feb  9 10:31:59 UTC 2014 ','127.0.0.1',17.625,28.937,17.75,17.687,'comments');
gbF( 'awk','t@pi','Sun Feb  9 10:32:06 UTC 2014 ','127.0.0.1',17.625,-1.25,17.812,17.687,'comments');
gbF( 'awk','t@pi','Sun Feb  9 10:32:13 UTC 2014 ','127.0.0.1',17.625,29.5,17.812,17.687,'comments');
<?xml version="1.0" encoding="UTF-8"?>
<!DOCTYPE svg PUBLIC "-//W3C//DTD SVG 1.0//EN" "http://www.w3.org/TR/2001/REC-SVG-20010904/DTD/svg10.dtd">
<svg xmlns="http://www.w3.org/2000/svg" xmlns:xlink="http://www.w3.org/1999/xlink" xml:space="preserve" width="600" height="600" >
<script type="text/ecmascript"><![CDATA[
//
// Include javascript guestbook and process it. Plots Temperature measurements from DS18S20.
//

var count=1
var opStr = ""

var linePointsStr2 = ""
var linePointsStr3 = ""
var linePointsStr4 = ""
var linePointsStr5 = ""
var xIndex = 50
var tempStr =""

//
// This function is called once per guestbook entry stored in gbookFtemp.js
// There is a lot of junk in there, which needs to be ignored.
//

function gbF( name,email,postedOn,IPaddress,userfield1,userfield2,userfield3,userfield4,comments){
//  var yvalue = 200 + Math.random()*32
  scale = 10.0
  var yvalue = userfield1*1.0
  if ( yvalue != -1.25) {    linePointsStr2 += xIndex + "," + ( 400 - yvalue*scale ) + " "  }
  var yvalue = userfield2*1.0
  if ( yvalue != -1.25) {    linePointsStr3 += xIndex + "," + ( 400 - yvalue*scale ) + " "  }
  var yvalue = userfield3*1.0
  if ( yvalue != -1.25) {    linePointsStr4 += xIndex + "," + ( 400 - yvalue*scale ) + " "  }
  var yvalue =  userfield4*1.0
  if ( yvalue != -1.25) {    linePointsStr5 += xIndex + "," + ( 400 - yvalue*scale ) + " "  }
  xIndex += 1
  tempStr = "last temperatures: " +userfield1 +","+userfield2+","+userfield3+","+userfield4

}

function plotMeasured() {
  //
  // Guestbox processed
  //
  obj2=document.getElementById("dhr2");
  obj2.setAttributeNS(null,"points", linePointsStr2  );

  obj3=document.getElementById("dhr3");
  obj3.setAttributeNS(null,"points", linePointsStr3  );

  obj4=document.getElementById("dhr4");
  obj4.setAttributeNS(null,"points", linePointsStr4  );

  obj5=document.getElementById("dhr5");
  obj5.setAttributeNS(null,"points", linePointsStr5  );
}

]]></script>

// window

<defs>
  <!-- Set up clip path to constrain graphs to plot window -->
  <clipPath id = "clip1">
    <path d = "M 48 53 L 548 53  L 548 420 L 48 420 L 48 53 "/>
  </clipPath>
  <radialGradient id = "g1" cx = "50%" cy = "50%" r = "50%" fx = "25%" fy = "25%">
    <stop stop-color = "#ffff66" offset = "0%"/>
    <stop stop-color = "#FFFFCC" offset = "50%"/>
    <stop stop-color = "white" offset = "100%"/>
  </radialGradient>
  <linearGradient id = "g2" x1 = "10%" y1 = "10%" x2 = "90%" y2 = "90%">
    <stop stop-color = "white" offset = "0%"/>
    <stop stop-color = "#7fff66" offset = "25%"/>
    <stop stop-color = "white" offset = "100%"/>
  </linearGradient>
</defs>

// outer square
<rect x="0" y="0" width="600" height="590" fill = "url(#g2)" />

//
// plot canvas
//
<rect x="48" y="53" width="500" height="500" stroke="blue" fill = "url(#g1)"  />

//
// define 4 polylines. javascript will change points later.
//

<polyline id="dhr2" fill="none" stroke="blue"   stroke-width="2" points="" clip-path = "url(#clip1)" />
<polyline id="dhr3" fill="none" stroke="lime"   stroke-width="2" points="" clip-path = "url(#clip1)" />
<polyline id="dhr4" fill="none" stroke="red"    stroke-width="2" points="" clip-path = "url(#clip1)" />
<polyline id="dhr5" fill="none" stroke="orange" stroke-width="2" points="" clip-path = "url(#clip1)" />

//
// minor axis lines
//
<line x1="52" y1="100" x2="545" y2="100" style="stroke:rgb(99,99,99);stroke-width:1" />
<line x1="52" y1="200" x2="545" y2="200" style="stroke:rgb(99,99,99);stroke-width:1" />
<line x1="52" y1="300" x2="545" y2="300" style="stroke:rgb(99,99,99);stroke-width:1" />
<line x1="52" y1="400" x2="545" y2="400" style="stroke:rgb(10,10,10);stroke-width:2" />
<line x1="52" y1="500" x2="545" y2="500" style="stroke:rgb(99,99,99);stroke-width:1" />


<text  x="260" y="20"  text-anchor="middle" font-family="Arial,Helvetica" font-size="14px" font-weight="bold" >Temperature Plot using SVG, run: bash loop.sh</text>
<text  x="260" y="40"  text-anchor="middle" font-family="Arial,Helvetica" font-size="14px" id="svg_21"        >data from gbookFtemp.js - DS18S20</text>
<text  x="260" y="580" text-anchor="middle" font-family="Arial,Helvetica" font-size="14px" font-weight="bold" >measurement</text>

<text transform="rotate(270,20,300)" x="20" y="300" font-family="Arial,Helvetica" text-anchor="middle" font-size="14px" pointer-events="none"  font-weight="bold" >Temperature Centigrade</text>

<text  x="30" y="500"  text-anchor="middle" font-family="Arial,Helvetica" font-size="8px" >-10 C </text>
<text  x="30" y="400"  text-anchor="middle" font-family="Arial,Helvetica" font-size="8px" >0 C </text>
<text  x="30" y="300"  text-anchor="middle" font-family="Arial,Helvetica" font-size="8px" >10 C </text>
<text  x="30" y="200"  text-anchor="middle" font-family="Arial,Helvetica" font-size="8px" >20 C </text>
<text  x="30" y="100"  text-anchor="middle" font-family="Arial,Helvetica" font-size="8px" >30 C </text>

<script type="text/ecmascript" xlink:href="gbookFtemp.js" />
//
// include data from guestbook and process.
//


//
// update polyline points
//
<script type="text/ecmascript"><![CDATA[

 obj6=document.getElementById("svg_21");
 obj6.textContent = tempStr

 plotMeasured()

 window.setInterval("location.reload();",6000);

]]></script>

</svg>