The App needed a slow stream of repeatable text to soak test it and fill up scroll buffers, over many minutes.
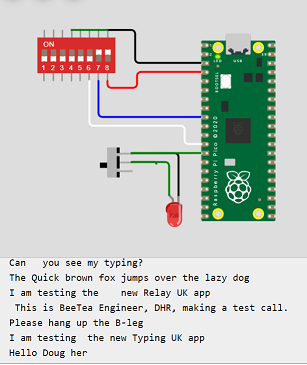
A simulation on a webpage: http://www.dougrice.plus.com/dev/DigiSpark/text2.html
Typically, Person A: types to Person B: and B: types back.
It needed a trickle of characters as if typed on the App's keyboard.
 * timeline:-
 * A:   | typing |GA| waiting   | typing    |GA| waiting   | typing
 * B:   | waiting   | typing |GA| waiting      | typing |GA| waiting
 *
 * A: types pressing keys on a keyboard, at up to 10 characters a second or slower
 * A: hands over to B: by sending "GA" to Go Ahead, then waits
 * B: reads the typing and can type but should wait until A: stops typing, before starting.
 * B: types and A: waits til B: stops.
 *
 * Typing on a smart phone soft keyboard is slower.
 *
 * some devices display both conversations in a single line of text, making it difficult to read.
 *
It needed a trickle of characters as if typed on a keyboard. It uses a countdown Timer incremented by a random interval.
str = "Hello this is a test loop."
needs to be sent character by character with an interval between each character.
 //blocking loop
 while( 1 ){
   emitNextCharFromStr()                // loop at end and repeat.
   sleep( 2*random( 1/TYPING_SPEED ) )  // delay between each key press could use Arduino BlinkWithoutDelay example
 }
 // or using countDown Timer and regular timer tick.
 onTimerTick(  ){
   countDown += -1
   if ( countdown < 0 ){
     emitNextCharFromStr()                // loop at end and repeat.
     countDown += 2 * random()*intervalBetweenTypingCharacter
   }
 }
There are Keyboard HID examples on devices like DigiSparks, Leonardos and the Raspberry Pico.
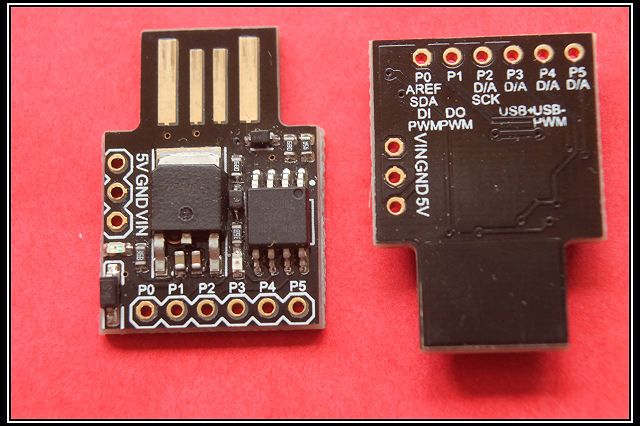
eBay had sold me some DigiSparks. I had heard about the Arduino Leonardo, but did not own any. eBay can supply then at an affordable price for a dabble.
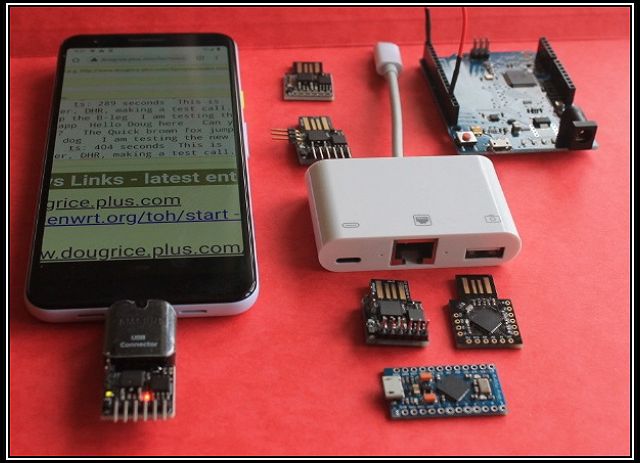
A DigiSpark or Leonardo and possibly a Raspberry Pi PICO is plugged into a PC or SmartPhone using an OTG dongle.
Move the cursor to the insert point and let it type.
The picture below shows some of my kit used to AutoType.
http://www.dougrice.plus.com/dev/DigiSpark/text0.html is a UART demo. http://www.dougrice.plus.com/dev/DigiSpark/text0b.html is a demo of character by character in javascript.
The Arduino IDE has this example. As a "starter for 10", it can be modified to slowly type a loop of text, character by character, as if manually typed :
#include "DigiKeyboard.h"
 void setup() {
  // don't need to set anything up to use DigiKeyboard
 }
 void loop() {
  // this is generally not necessary but with some older systems it seems to
  // prevent missing the first character after a delay:
  DigiKeyboard.sendKeyStroke(0);
  // Type out this string letter by letter on the computer (assumes US-style
  // keyboard)
  DigiKeyboard.println("Hello Digispark!");
  // It's better to use DigiKeyboard.delay() over the regular Arduino delay()
  // if doing keyboard stuff because it keeps talking to the computer to make
  // sure the computer knows the keyboard is alive and connected
  DigiKeyboard.delay(5000);
 }
Microchip do USB chips and the PIC14K50 is one of them. I tried to see if I could use them. Some notes: AutotypingMicrochip . Work in progress.
With "Arduino MBED OS RP2040 Boards 3.3.0" installed you can generate .uf2 files for upload to the PICO
https://github.com/arduino/ArduinoCore-mbed
https://github.com/arduino/ArduinoCore-mbed/tree/master/libraries/USBHID/examples
There is a USBHID keyboard example.
 #include "PluggableUSBHID.h"
 #include "USBKeyboard.h"
USBKeyboard Keyboard;
 void setup() {
  // put your setup code here, to run once:
 }
 void loop() {
  // put your main code here, to run repeatedly:
  delay(1000);
  Keyboard.printf("Hello world\n\r");
 }
http://www.dougrice.plus.com/dev/DigiSpark/KeyboardRP2/KeyboardRP2.ino is my AutoType ported for an RP2 PICO, Digispark and Arduiono Leonardos
http://www.dougrice.plus.com/dev/DigiSpark/KeyboardRP2_min/KeyboardRP2_min.ino is my AutoType ported for an RP2 PICO and simplified.
Pinouts: https://www.raspberrypi.com/documentation/microcontrollers/images/pico-pinout.svg
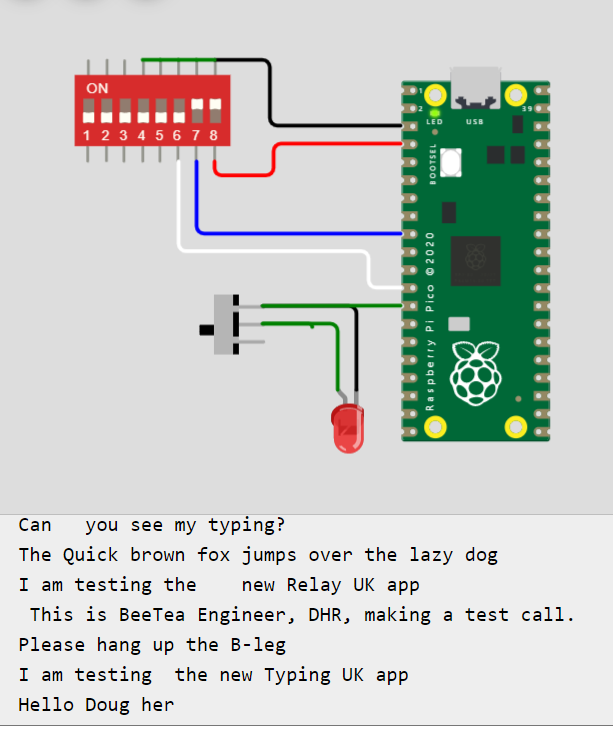
My Raspberry Pi Pico is the header version so I can use Links or switches to short pins to ground to select options.
The USB can enumerate as a CDC Serial Port, Keyboard aand Mouse on the Leonardo, but for the Wokwi simulation only output to Serial.
https://wokwi.com/projects/346791883892064850 - wokwi simulation using serial port instead of the the keyboard.
https://wokwi.com/projects/346834968012390996 - another wokwi simulation using serial port instead of the the keyboard.
 * timeline:-
 * A:   | typing |GA| PAUSE | waiting   | typing    |GA| PAUSE | waiting   | typing
 * B:   | waiting   | typing |GA| PAUSE | waiting      | typing |GA| PAUSE | waiting
 *
https://wokwi.com/projects/374155777079400449 - Use HALT to set a PAUSE period
http://www.dougrice.plus.com/dev/DigiSpark/LeonardoAutotypeFlipFlopWiredOrSerial/LeonardoAutotypeFlipFlopWiredOrSerial.ino - pipe through Serial1 TX RX pins on Leonardo
http://www.dougrice.plus.com/dev/DigiSpark/KeyboardRP2/KeyboardRP2.ino is my AutoType ported for an RP2 PICO, Digispark and Arduiono Leonardos
The Arduino example is very simple. Setting up the Arduino IDE takes less than an hour when using the Arduino Leonardo and my example.
The DigiSparks code for the Arduino IDE comes with a very simple example to use it as a HID keyboard.
It would be possible to add an AutoType Automata in the App code. This page also has links to other ways to automate typing using Microsofts cscript and wscript. There is also java robot and it is possible to get windows to press keys and move the mouse.
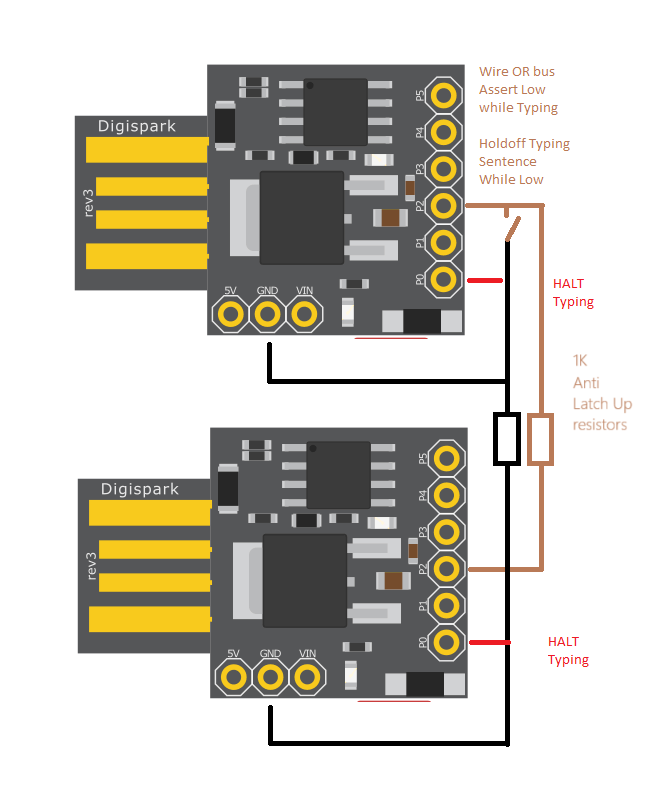
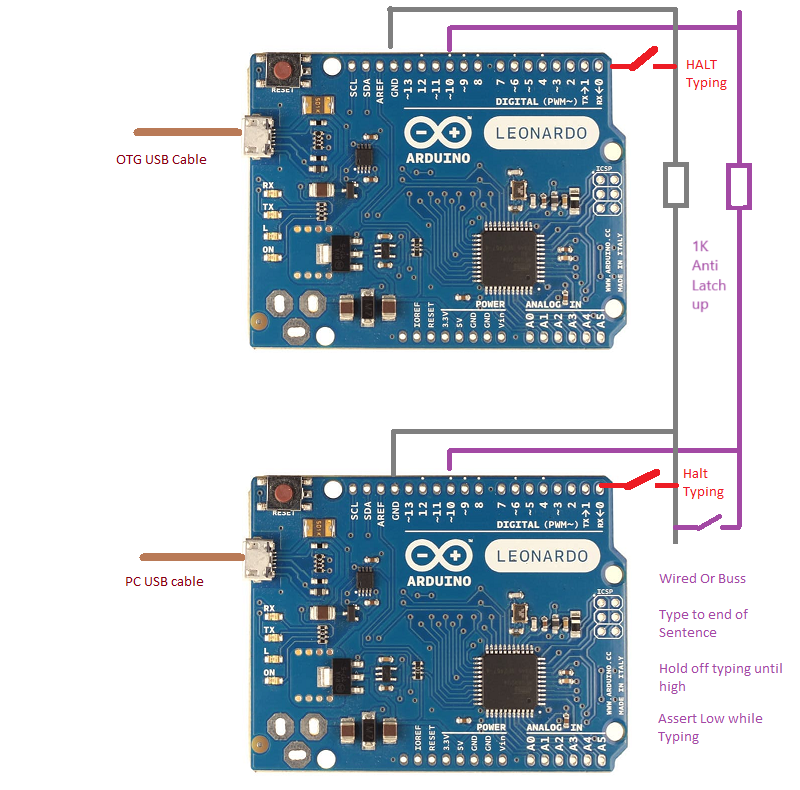
Use two and use the LED and inputs to handshake, so both were not typing over each other.
One input HALTs the typing - This is important when trying to reprogram them. The typing needs to be disabled.
Another input can be used to wait till the end of the sentence, before it starts typing another sentence.
This allows a ONESHOT or ASTABLE or CONTINUOUS way of working.
The Arduino IDE comes set up for the Arduino Leonardo. See here for DigiSparks
Updated to emit timestamp slowly. See http://www.dougrice.plus.com/dev/DigiSpark/LeonardoAutotypeFlipFlopWiredOr/LeonardoAutotypeFlipFlopWiredOr.ino
It needs some configuration to select Leonardo or DigiSpark, and if '\n' sends <ENTER>
early try:-
http://www.dougrice.plus.com/dev/DigiSpark/Keyboard_button3/
  timeline:-
     | pause     | typing |GA| PAUSE        | typing |GA| PAUSE
     | typing |GA| PAUSE     | typing    |GA| PAUSE     | typing
  Turn on LED
  LED| off       | On        |  off         | on        | Off
  LED| on        | off       |  on          | off       | On
A keyboard only types, so cannot read the other person's text. The devices have inputs and outputs so these can be used to co-ordinate typing in turn.
This web page tries out this idea, and allows other strategies to be tested: http://www.dougrice.plus.com/dev/DigiSpark/text2.html
In the end having one as master and the other as slave worked best.
The AtoD also offers options to select what it does.
It is important to be able to disable the typing when plugged in.
The DigiSparks are super, but it is also possible to use an Arduino Leonardo to Autotype? text in a loop.
Here are two later versions which can be configured to use the DigiSpark or Arduno Leonardo.
It was a bit of a challenge to get a version where one types while the other one waits for it to stop.
These may need configuration to select:
Handshaked version:- May need configuration http://www.dougrice.plus.com/dev/DigiSpark/LeonardoAutotypeFlipFlop/LeonardoAutotypeFlipFlop.ino
Wired Or version:- May need configuration See http://www.dougrice.plus.com/dev/DigiSpark/LeonardoAutotypeFlipFlopWiredOr20230827/LeonardoAutotypeFlipFlopWiredOr.ino
A solution that works it to have two inputs:
Have an output that is asserted
Another solution would be to have a Play Script that was typed out. The device would be given a part in the script. There would be a SYNC input so each character would not talk over each other.
The device being tested has a user who types, and a connection to a distant end over a modem or TCP/IP stream. An automata could be built into the device to inject characters as if typed or received from the remote end.
The picture below shows some of my kit used to AutoType. A DigiSpark is plugged into a SmartPhone using and OTG dongle.
Wire together so when one end types a sentence, the other one waits. It is not essential to use this.
A switch can be used to ONE SHOT a sentence. It is possible to have more than two devices on the BUS. Two may assert the bus and start typing together.
NOTE: The interconnect wires need resistors to limit current when one end is an output and the other end is being driven and powered off.
There is a risk of latch up, and when programming the device,
Sometimes the Leonardo has got hot if the other device is connected but unplugged.
LATCH-UP: I used two 1K resistors to limited latch up current.
I found I could assert a LOW on the Typing lead with a 15K resistor, so I used 1K anti-latch up resistors.
You should never connect a voltage greater than the supply voltage to an input. Sigificant current can flow that latches up the device and it can sink a large current, like a TRIAC.
Protection diodes work with the Anti-latch up resistors.
( I needed anti latch up resistors on a project that measured battery voltages and solar cells. If the Arduino's batteries go flat, the battery voltage being measured can supply a large current that latches up the Arduino or Microchip Pic chip. see: http://ccgi.dougrice.plus.com/cgi-bin/wiki.pl?Arduino_Based_Logger_And_SVG_Graph and http://www.dougrice.plus.com/rt004/sr3/Logger.html ).
Normally, one AutoType is plugged into the OTG cable of a smart phone or tablet, so is not plugged into the mains.
Using DigiSparks:
Using Arduino Leonardos:
It would be nice if a PAUSE period could be set. Using the HALT pin use a button, press it for the duration of PAUSE required. It is reset to zero each time the AutoType device is plugged in.
 * timeline:-
 * A:   | typing |GA| PAUSE | waiting   | typing    |GA| PAUSE | waiting   | typing
 * B:   | waiting   | typing |GA| PAUSE | waiting      | typing |GA| PAUSE | waiting
 *
WOKWI prototype: https://wokwi.com/projects/374155777079400449 - Use HALT to set a PAUSE period
It adds a Countdown Timer, which is started at the end of each sentence, by the period set by holding HALT low.
Bubbling is a word that describes the bubbles of text displayed. A: and B: have a "bubble" of text.
 A: _ = _ _ _  _ = = = = _ _ _
 B: _ _ _ = _  _ _ _ = = = _
In turn Over Lapping
When considering the bubbling, if the typing overlaps, what do you do?
This is complicated. What overlaps? Words, Sentences, Paragraphs. The Pause between A ending and B starting? Same diagram! The longer the item, the more likely it is to overlap.
When overlapping, the bubbles of text break up and it may be better to agregate, but this cannot be in real time.
If the bubble is small or covers a small time period, consider not bubbling on GA or pressing enter.
If the bubble gets very big because GA or enter has not been pressed or there has not been a pause in typing consider bubbling on the next GA or enter.
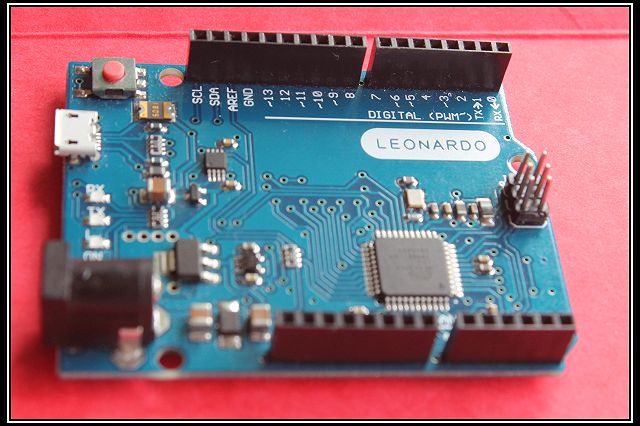
The Arduino Leonardo is a microcontroller board based on the ATmega32u4.
It is easy to get the Arduino IDE to work.
 * https://www.arduino.cc/
 * https://www.arduino.cc/reference/en/language/functions/usb/keyboard/
 * https://www.arduino.cc/en/Tutorial/BuiltInExamples/KeyboardMessage
 * JavaScript Prototyping tool:-
 * http://www.dougrice.plus.com/dev/DigiSpark/text3.html
 * http://www.dougrice.plus.com/dev/DigiSpark/text0.html - demo of character by character using UART
It is important to have an input to HALT the typing - This is important when trying to reprogram them. The typing needs to be disabled.
Another input can be used to wait till the end of the sentence, before it starts typing another sentence.
This allows a ONESHOT or ASTABLE or CONTINUOUS way of working.
The Arduino IDE comes set up for the Arduino Leonardo.
With "Arduino MBED OS RP2040 Boards 3.3.0" installed you can generate .uf2 files for upload.
https://github.com/arduino/ArduinoCore-mbed
https://github.com/arduino/ArduinoCore-mbed/tree/master/libraries/USBHID/examples
There is a USBHID keyboard example.
 #include "PluggableUSBHID.h"
 #include "USBKeyboard.h"
USBKeyboard Keyboard;
 void setup() {
  // put your setup code here, to run once:
 }
 void loop() {
  // put your main code here, to run repeatedly:
  delay(1000);
  Keyboard.printf("Hello world\n\r");
 }
http://www.dougrice.plus.com/dev/DigiSpark/KeyboardRP2/KeyboardRP2.ino is my AutoType ported for an RP2 PICO
The Arduino IDE can be used with added tools. See Digisparks.
These are easy to use, as the Arduino IDE can program them as - use Board: Arduino Leonardo
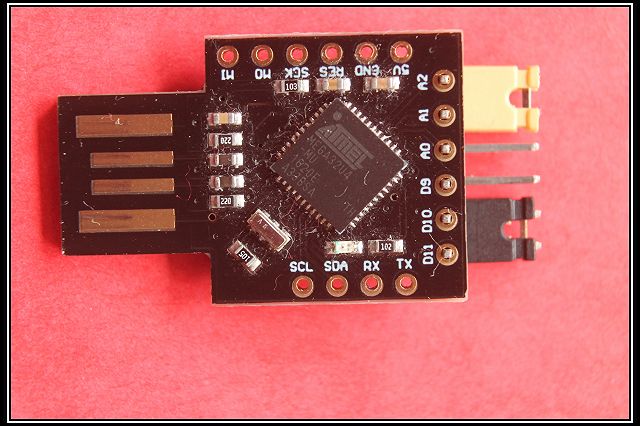

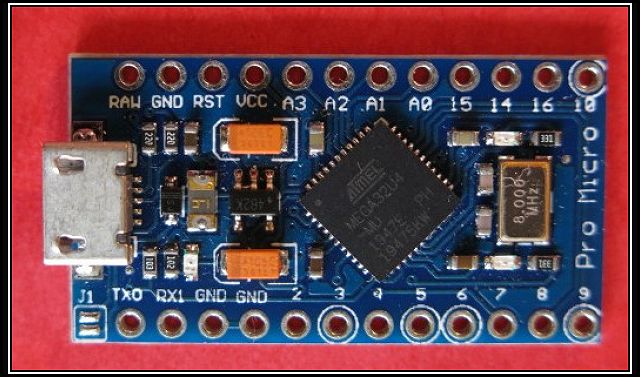
eBAy supply Arduino Pro Micro boards. They are smaller and fewer pins.
They use the same chip as the Leonardo, but if run at 3.3 volts they need an 8MHz clock instead of 16MHz clock used by the 5.5V Leonardo.
If you use the 8MHz version, they can be run at 3.3V or strapped to 5V.
The 8MHz version work if you select a different board
 *
 * Arduino Pro Micro 8MHz
 *  Board: LilyPad Arduino USB
 *  Programmer: N/A - Arduino ISP
 *  It does not have D11 so change to D10
 * Strap 5V on JP2 on USBasb board:- https://www.fischl.de/usbasp/  available fro eBay
The boot loader has needed to be reloaded after selecting board: Leonardo instead board: LilyPad USB.
I brought a USBasb off eBay and uses https://www.fischl.de/usbasp/
LED_BUILTIN is not available.
pinMode(LED_BUILTIN, OUTPUT); // not available.
The LED can be controlled using these macro:
 TXLED0; //turn off TXLED
 TXLED1; //turn on TXLED
 RXLED0; //turn off RXLED
 RXLED1; //turn on RXLED
Also:-
 int RXLED = 17; // The RX LED has a defined Arduino pin
 int TXLED = 30; // The TX LED has a defined Arduino pin
see more at: https://www.electronicsweekly.com/blogs/engineer-in-wonderland/arduino-micro-direct-access-board-leds-2017-08/
The 16Mhz versions appear as Arduino Leonardo The 8Mhz versions appear LilyPad Arduino USB and have a different VID and PID.
Use lsusb to display the vid and pid. The 8Mhz has a different VID:PID to the 16MHz Leonardo.
These devices can be used for Rubber Ducky scripts, but here they are being used as stated on this page.
![[Home]](../ipstats.gif)